02 December 2007

Sufiganiot (Jelly Donut Heaven)


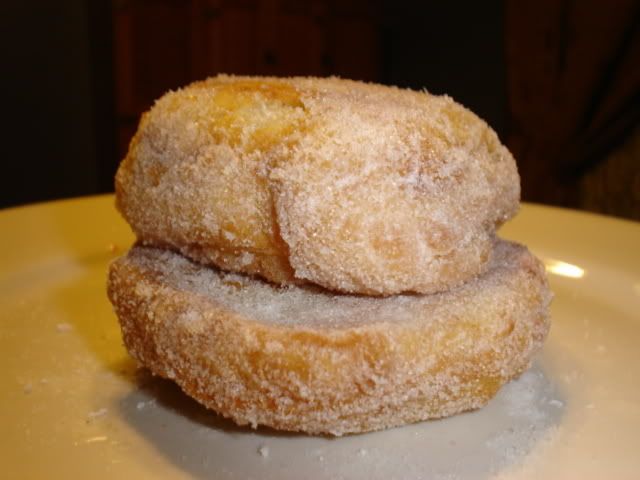
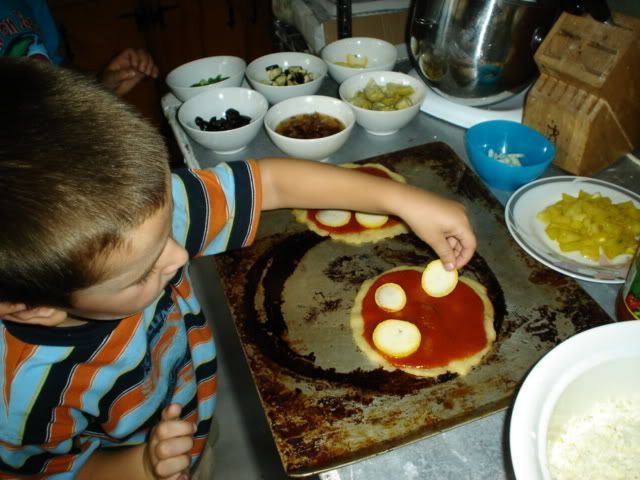
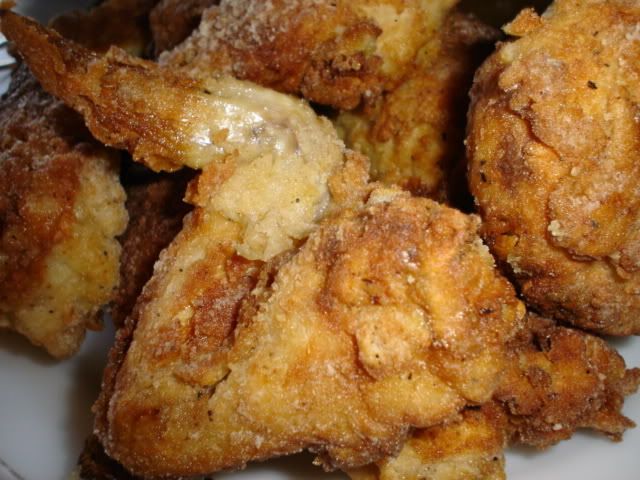
I was in the mood for Jelly Donuts. Really in the mood: so that's what we ate for dinner. *shrugs* If you don't mind putting on a thousand pounds it's really the best dinner on earth. Really... ask my children!

So anyway, I made several variations in powdered sugar and plain sugar, both traditional and yeast-free:
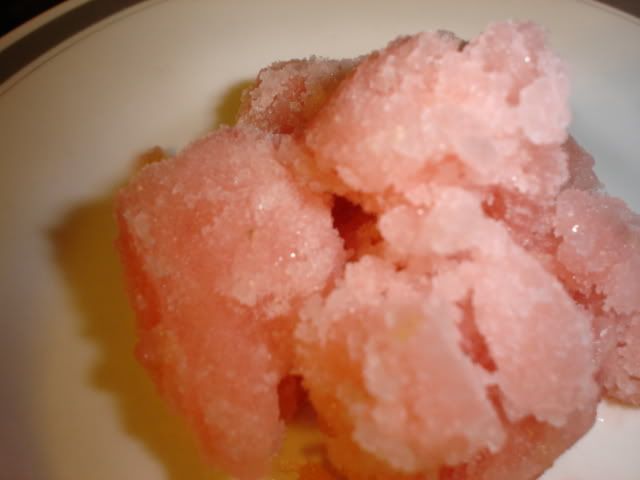
Filled with strawberry jam,
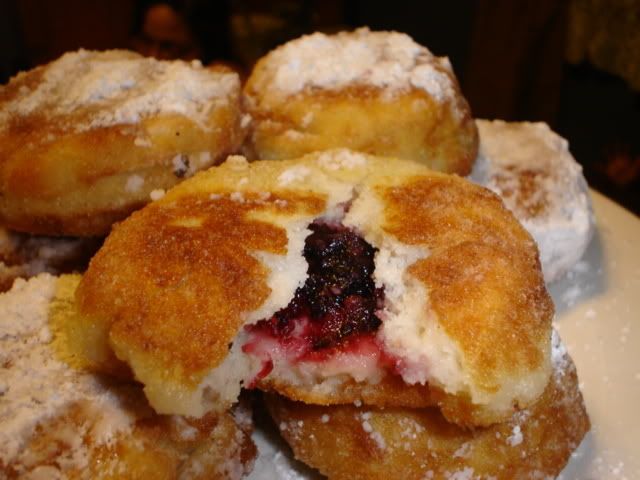
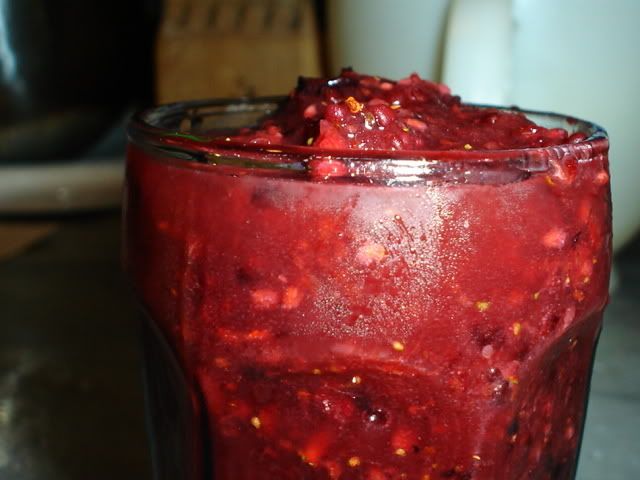
Filled with homemade cran-rasp-blueberry jam
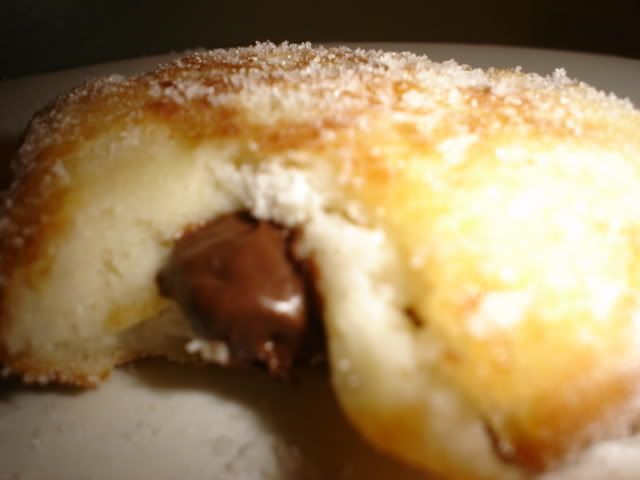
Filled with Nutella, which is totally not jelly, but you'll of course forgive me.

Tomorrow I'm planning on making strawberry-filled banana ones, strawberry filled chocolate ones, cran-apple filled nutmeg-scented ones, and perhaps a few others. Not sure yet.

Here's the basic recipes. Filling recipes are below that:

Sufiganiot (Traditional Hanukkah raised jelly donuts)

1 tbsp yeast
1 tbsp sugar
2 tbsp water
1 tbsp Better Batter Gluten Free Flour

3 c Better Batter Gluten Free Flour
1/4 c butter or margerine, melted
1/8 tsp salt
3 Tbsp sugar
2 eggs
2 1/4 c water

Flour, for rolling

jelly
oil for frying
powdered or granulated sugar

1. Combine the first four ingredients in a large bowl, and let them sit for abotu 5 minutes. Add the flour, salt, and sugar and stir well.

2. Crack the eggs into the water. Stir this into the flour mixture, until the mixture is relatively smooth. Beat in the melted butter or margerine and let sit in a warm place to rise.

3. Flour a parchent paper or silpat lightly. flour your hands. Dump the dough onto the floured surface and dust the top with flour. Press out to about 1/4 inch to slightly less than 1/2 inch thick. This will still be very sticky inside! Meanwhile heat oil, at least 2 inches, in a skillet or fryer to about 400 degrees.

4. With a small biscuit cutter (about 2 inches), cut circles out of the dough. Place a tsp. of jelly on half of the circles. Dampen hands and wet the rims of the other half of the circles. Press one empty circle on top of a filled circle, and gently pat around the sides to make a nice jelly donut shaped donut.

5. Fry in hot oil until golden brown on one side, then flip and fry on the other side. Remove with a slotted spoon, and roll in sugar. Serve very fresh.


Yeastless Jelly Donuts

5 c Better Batter Gluten Free Flour
1 1/2 Tbsp baking powder
1 tsp salt
4 c water or milk

1. Mix the Four, baking powder, and salt.

2. Stir in the water, until mixture is well combined.

3. Flour a parchent paper or silpat lightly. flour your hands. Dump the dough onto the floured surface and dust the top with flour. Press out to about 1/4 inch to slightly less than 1/2 inch thick. This will still be very sticky inside! Meanwhile heat oil, at least 2 inches, in a skillet or fryer to about 400 degrees.

4. With a small biscuit cutter (about 2 inches), cut circles out of the dough. Place a tsp. of jelly on half of the circles. Dampen hands and wet the rims of the other half of the circles. Press one empty circle on top of a filled circle, and gently pat around the sides to make a nice jelly donut shaped donut.

5. Fry in hot oil until golden brown on one side, then flip and fry on the other side. Remove with a slotted spoon, and roll in sugar. Serve very fresh.


Cran-rasp-blueberry jam:
In a blender, combine...
1 c cranberries
1/2 c water
1/2 c sugar
1/4 c dried blueberries
1/4 c dried raspberries

Cook over high heat for 5 minutes, or until it boils for a few minutes. Let cool.

14 November 2007

Vegan Stuffed Shells For Everyone

I wish I had a beautiful photo to show you... but hubby grabbed the plate of shells and took off with it to the bedroom... apologies to all, lol.

I've been having problems with most dairy for about 4 months now - I finally tracked down another source of migraines. Dairy. Drat. Mozzarella seems to be okay, strangely enough. In talking with others who have dietary induced migraines, I've heard the same thing. If anyone would like to explain to me why mozzarella is fine but, say Cream Cheese (which is another fresh cheese) isn't, I'd love to hear it. Occasionally I'll give into temptation and still have some kind of cheese - because I just love cheese - but generally speaking I am trying to avoid dairy altogether.

Anywhoodles... This stuffed shells recipe is delicious enough to please even the most picky eater. It really tastes like traditional stuffed shells.

If you don't have any objections to dairy, forego the vegan angle and top the shells with a lot of really nice mozzarella. Do that and no-one will even know that the filling isn't dairy.

This is a great way to use up all that pulp left over from making nutmilk.


Stuffed Shells

1 1/2 c nut-pulp (instructions below)
1 c sesame seeds
1 Tbsp lemon juice
1/2 c water
2 Tbsp parsley
1 clove garlic, crushed and minced to smithereens

1 package Tinkyada large shells

6-8 cups Chunky Tomato sauce (We like Ragu Organic or Muir Glen Chunky Tomato Sauce)

Optional- 8 oz. Whole Milk Shredded Mozzarella


1. You'll need to start this meal the night before you want to eat it, by making nut-pulp.

Start by taking 2 c almonds (I reccommend blanched almonds for the cleanest, whitest look) and placing them in a large mixing bowl. Boil 2 c water and pour over the almonds. Let soak for about 1/2 hour, or until the liquid looks milky.

Pour this mixture into your blender and blend on high speed until smooth. Wet a towel or nutmilk bag and pour the liquid into it, over a bowl) squeeze out the liquid.

Add 2 more cups COLD water to the blender and return the nutpulp to the blender. Blend for another minute or so. Strain this liquid.

Repeat the cold water step until the liquid being squeezed from the nutpulp looks like whey (milky water). Set the nutmilk aside to use for something else.

Take the nutpulp, sesame seeds, lemon juice, and water, and combine them. Let soak overnight, in the fridge.

The next day, whir this mixture in the blender until it's smooth. Add the parsley and garlic and whir again, until the parsley's chopped fine.

2. Boil the shell pasta until they're al-dente. Drain.

3. Put about 3 or 4 cups of pasta sauce in the bottom of a casserole.

4. Fill the shells with the 'ricotta' mixture and place into the sauce. Top with more sauce. (if you'd like add cheese now)

5. Tope with remaining sauce and bake at 350 degrees for about 30 minutes or until hot.

YUM!

12 November 2007

Vegetarian Potstickers

Potstickers are tasty dumplings, filled with vegetables, that can be steamed or pan fried. The secret to a good potsticker is to roll the dough very thin. This recipe makes about 60 potstickers. Feel free to half the recipe, and make other fillings, for a variety.

1 tbsp oil

2 c finely minced green cabbage

1/2 c finely shredded carrot

1/2 c chopped water chestnuts

1/2 c bamboo shoots, minced

10 cloves garlic, crushed to a paste

2 Tbsp ginger, minced (available at the grocery or mince your own)

1/4 c minced green onion

1/2 tsp salt

1/2 tsp dark sesame oil

1 recipe Base for stuffed Pastas

Flour, for rolling, as well as a 3 inch round cookie cutterand potsticker press (optional)

water or egg white

Heat the oil in a large pan. Add the cabbage and cook until wilted, about 9 minutes. Remove from heat and let cool.

Add the carrot, chestnuts.bamboo shoots, garlic, ginger, green onion, salt, and sesame oil and stir well to mix.

Split the pasta in half, and roll out one half at a time. Place the dough on a floured surface (I like to use a silpat) and sprinkle generously with flour. Roll out until the dough is 1/8-1/4 inch thick.

Gently fold the dough in half to mark the center crease and unfold.

Using the cookie cutter, lightly mark circles on half the dough (do not cut through the dough!

Working quickly coat the marked side of the dough with water or egg white and place a large teaspoon (up to a tablespoon) of filling in the center of each circle.

Fold the dough over and press lightly to seal around the pockets of filling.

Using the cookie cutter, cut out the circles of dough. Gather and reroll the scraps, continuing to mark and fill the dough as instructed. Set aside to dry while you make the second half of the pasta.

Alternately, cut three inch circles and use a potsticker press to fill and seal the potstickers. Use a little egg white on the edges before sealing.

Heat 2 teaspoons vegetable oil in a large nonstick skillet over medium heat. Place half of pot stickers in bottom of skillet; cook 3 minutes or until bottoms are lightly browned. Add 1/2 cup water to skillet; cover and cook 3 minutes or until liquid is absorbed. Place pot stickers on a serving platter; set aside, and keep warm.

Wipe skillet with a paper towel. Repeat procedure with remaining vegetable oil, remaining pot stickers, and remaining water.

Serve with Dipping Sauce (Below):

Dipping Sauce

6 Tbsp GF Tamari Sauce

3 Tbsp rice vinegar

1 tsp hot chili oil OR sesame oil

1/2 tsp brown sugar

1 tsp minced garlic

1 tsp minced ginger

Combine all ingredients and let sit for about an hour before serving.


Cincinnati-Style, 4 1/2 Alarm Chili

According to legend, Cincinnati Chili was created by a Middle-Eastern immigrant who combined his favourite spices with meat sauce, put the conglomeration on top of pasta, added traditional 'chili' accompaniments, and marketed it well.

Whatever the truth of the matter, Cincinnati Chili is a unique and fabulously delicious meal - a filling combination of sweet and savoury with a tiny 'kick' of spice.

Real 5 alarm chili is made with a copious amount of ground beef, which is cooked in the highly spiced tomato sauce, producing a thick, very fine texture. Obviously, any vegetarian recipe is going to omit the beef. I've seen plenty of recipes which skirt this difficulty by using ground soy crumbles. Since we don't do soy in almost any form (except fermented wheat free soy sauce), this presented a problem.

I decided against using my favourite eggplant/walnut 'meat' combination, because I feared the combination of the eggplant with the spices, which truly are middle-eastern (in part) would make the dish taste too much like mousakka.

I experiemented with a number of options, but in the end, I settled for making a nice 'bean-paste roux' and using it to thicken the sauce. This allowed the flavour of the spices to shine through while giving the sauce a little more 'body' and stick-to-your-ribs protein.

My family adored it, and no-one complained about the meat. If you're not opposed, feel free to stir in soy crumbles, or heck! Use Ground beef. Either way, this is the best Cincinnati chili you'll find outside of the state.

FYI: The 'alarms' in a 5 alarm chili are the following. I have it on good authority that for an authentic 5 alarm chili (or in this case 4 1/2 alarm) , one simply 'must' add the toppings in the order listed. Of course, I ignore all of this, but hey...:

2 Alarm Pasta topped with Cincinnati style chili

3 Alarm Pasta, Chili, Sharp Cheddar Cheese (and don't skimp on the cheese!)

4 Alarm Pasta, Chili, Cheese, Chopped Onions

5 Alarm Pasta, Chili, Cheese, Onions, Kidney Beans


And now, here's the recipe:

Cincinnati-Style 4 1/2 Alarm Chili

2c cooked kidney beans, divided
1 c oil
2/3 c Better Batter Gluten Free Flour
1 1/2 c minced onion
1 clove minced garlic
1 tbsp chili powder
1 tsp ground allspice
1 tsp ground cinnamon
1 tsp ground cumin
1/4 tsp cayenne pepper
1/2 tsp salt
1 1/2 tbsp cocoa
1 15oz can diced tomatoes with chilis
1 tbsp Worcestershire sauce
1 tbsp apple cider vinegar
1 c water


Cooked pasta
Sharp Cheddar Cheese
onions
kidney beans


In a blender, combine the 2c kidney beans and flour and blend til smooth.

In a large pot, heat the oil. Add the bean paste and cook, stirring, until the bean paste absorbs most of the liquid and begins to thicken. You'll need to scrape the bottom of the pan continuously.

Add the rest of the seasonings, ending with the water. Simmer, uncovered, for at least an hour or up to three hours.

Serve on top of pasta, with toppings, if desired.

05 November 2007

I have been sooooooo sick

Oh my word.

I've been down and out for at least three weeks now, so I'm biting the bullet and going to the doctor.

No idea what's wrong with me.

I'll keep you posted.

20 October 2007

Gluten Free Menu Swap... a spiffing idea!


Gluten Free Menu Swap Monday


I'm posting my first menu for the Gluten Free Menu Swap. Hope I don't screw it up, lol.
I'll post my veggie meals here and all my other recipes over at Better Batter.
Okay, here goes:

Week of October 22, I'm making...

M Garlic-Basil Dinner Loaves with Artichoke heart and Fontinella Cheese Filling

T A Super-Easy Dal (with apple! You heard right....apple) with Naan

W Black-Bean and Pumpkin Soup

T Hot Mess (Aka Hunter's Breakfast)

F Mexican Stuffed Peppers

S I'm leaving Free to Try Your Recipes!
S I'm leaving free to Try Your Recipes!

This week's menu swap is hosted by Mrs. G.F.
Stop in and give her your love!

13 October 2007

Why did I Drop the Raw Foods Thing?

Raw foods! Ahhhhhh raw foods. Delicious, healthy, light and easy recipes for a busy lifestyle. So why, oh why, dearest reader, did I drop the raw foods thing?

Because, in a nutshell, it was very bad for me.

Not the raw foods themselves. The lifestyle.

Okay,

A)
Hunny wasn't buying 100% raw. So essentially, though we could survive through breakfast and lunch together, I always had to make separate dinners. Which meant I spent 1/2 of my day in the kitchen. 3/4 for a really gourmet 'uncooked' food.

B) It was too easy to slide into my old eating disorder. Maybe this isn't true for anyone else, or everyone else, or...whatever. But for me, the push to 'go 100% raw' was really too obsessive. I found myself counting percentages instead of calories, and worrying about every little thing I put into my mouth. I started getting aversions to foods that I know scientifically are healthier for you if cooked. I... it wasn't good, and it wasn't going to be healthy if I kept on keeping on.

C) It was hard to get certain vitamins and minerals (like the B vitamins) into my diet. And I feel vitamin deficiency terribly fast -- keep in mind, I've had to be dairy free for a while now, so with no animal based form of nutrition at all, I slid into deficiency hard-core. This is, I suppose, why so many people choose to do a little dairy or eggs with their veggie lifestyle. "Why not take a supplement?"... because the supplements are animal-based (see B above). "why not try masive quantities of sea vegetables?"... I did. It didn't help -- the B vitamins in seas veggies didn't absorb well. ugh. ANd yes, we do eat sea veggies all the time, so there was no aversion.

D) Did I mention that it's getting cold where I live? Really cold. Like dark, dark days of autumn, sliding into the eternal night of winter cold... The only fresh, local, organic, raw produce available here right now is kole veggies (which are fine fermented) and squashes (which get a little rough to take raw). I'm really into local, sustainable Community supported agriculture. (Isn't everybody). So we've got a war of philosophies going. And even if I give in and buy the imported organic-goods (and admitedly I do every so often, especially come winter when my garden's not producing and neither is my local farm), I'm not a Hollywood celebrity,and there's no eternal summer here in the mountains, so unless I want to mortgage my house, 100% raw was not going to happen. Period.

E) One last thing. I'm a research gal. There's a lot of misinformation going on in the Raw community right now. A lot of good, but a lot of missed. For instance, the whole nuts thing. For a while, the only truly RAW nut you could find was almonds, if you wanted to split hairs, and now, even that's hard to find unless you live in CA. Did I mention I can get a tad obsessive?


Anwhoodles.... point being:

I eat a lot of Raw anyway. I'm not going to worry about exactly HOW raw I am. I'm going to enjoy cooked foods and supplement heavily with fresh seasonal veggies, raw or gently cooked, and loads of fresh seasonal fruits (my strawberries and raspberries are just coming on heavily!). I eat well. I eat sustainably. I like to bake. I don't want to make myself starve again.

I'll still use raw recipes. I'll still eat raw. But it's a part of my lifestyle... not my identity.

Cool? Cool.

11 October 2007

Because I'm in a Baking Mood...Bagels

Yeah, yeah, yeah, I know I usually post actual entrees. But I'm in a baking mood and totally off the raw food wagon (or kind of, anyway)... so I'm posting what I've been gorging myself on the last two days - bagels!!!!!!!!!!!!!

Here's the recipes for those who are interested.

I get a lot of questions when I post a recipe calling for Better Batter Gluten Free Flour, so I'm providing a link to the website. Knock yerself out.

Meanwhile... Here's the recipes:

Everything Bagels

These are a near clone of the Everything Bagels you can buy at the Einstein Brothers bagel shops. These bagels fill the house with the smell of a bagel shop. They taste awesome toasted with butter. For a treat, make them into Breakfast Sandwiches.

I'm including photos of each step to try and make it easier to visualize. Follow the directions carefully and you'll have real bagels in no time! This recipe makes 24 large bagels.


8 cups all purpose flour
1/4 c sugar
1/4 c molasses
2 Tbsp salt
2 packages active dry yeast
6 cups warm water

2 egg whites, beaten with 2 tbsp cold water
1 tablespoon dry minced onion
1 tablespoon dry minced garlic
1 1/2 teaspoon poppy seeds
1 1/2 teaspoon caraway seeds
1 1/2 teaspoon sesame seeds
1 1/2 teaspoon kosher salt

Flour, for rolling
Water plus sugar for the water bath (1 Tbsp per 2 quarts)
cornmeal for dusting the pans


Preheat oven to 375 degrees. Line three or four baking sheets with parchment paper and sprinkle with cornmeal.

1. Mix all Dry ingredients in a large bowl. Add the water and molasses and knead with your hands until the mixture resembles very sticky play-doh.

2. Lightly flour a silpat or plastic wrap (it should barely be covered with a fine film of flour). Divide the dough into softball sized portions (you can make them smaller for a mini bagel, or larger for a deli-sized bagel)

3. Gently roll the dough balls on the floured surface of the silpat until they're smooth. Flatten each ball ito a disk, about 4 inches by 1 1/2 inches thick.


4. Verygently, with floured hands, poke a hole into the center of the dough an work it until the hole is about 1 1/2 inch in diameter. Repeat with all the dough. Let the bagels rise for 30 minutes.


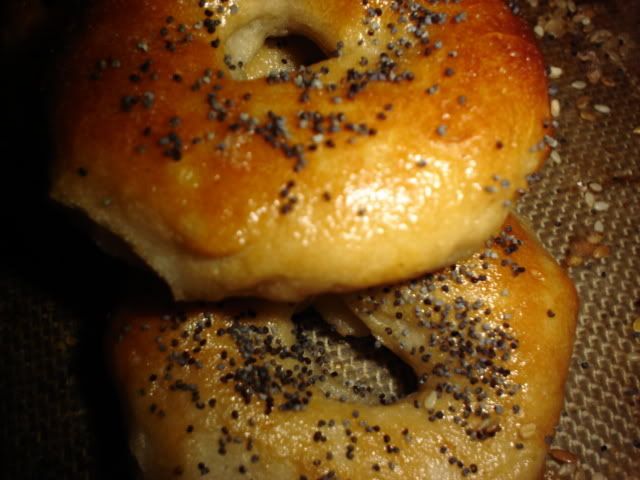
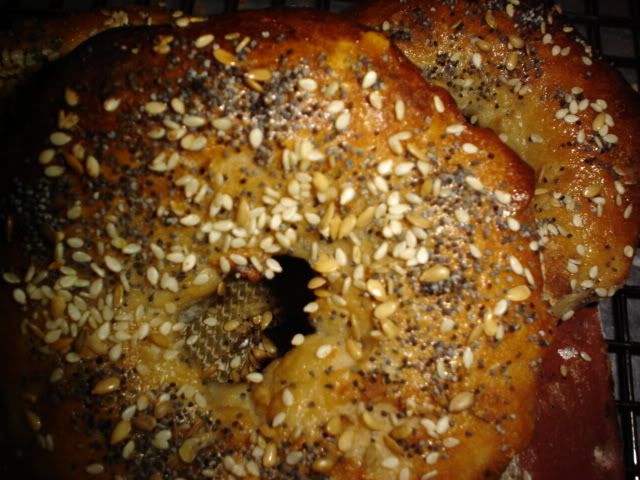
5. Heat a pan full of water, at least 3 inches deep to boiling. Add about a tablespoon of sugar per 2 quarts of water. Drop no more than 3 bagels in at a time (they swell as they cook)!


6. Simmer for 3 minutes, gently turn over and simmer for another 4 minutes.


7. Place back on parchment paper. When the tray is full, place in the oven and bake for 10 minutes.
Meanwhile combine all of the onion, garlic, poppy seeds, caraway seeds, sesame seeds and salt.Remove from oven and brush all over with egg white mixture and sprinkle equally with the seed mixture.

Return to oven and bake for 20-30 minutes more, or until deep golden brown. Let cool completely before slicing.

Variation: Substitute all poppy seeds or all sesame seeds for the seed mixture.


New York Style Water Bagels

These really and truly taste, look and have the mouth feel of a great bagel. Serve with cream cheese and, if you're so inspired, lox. They freeze beautifully and reheat well. For a treat, make them into Breakfast Sandwiches.

8 cups all purpose flour
1/2 c sugar
2 Tbsp salt
2 packages active dry yeast
6 cups warm water

2 egg whites, beaten with 2 tbsp cold water

Flour, for rolling


Preheat oven to 375 degrees. Line three or four baking sheets with parchment paper.
1. Mix all Dry ingredients in a large bowl. Add the water and knead with your hands until the mixture resembles very sticky play-doh.

2. Lightly flour a silpat or plastic wrap (it should barely be covered with a fine film of flour). Divide the dough into softball sized portions (you can make them smaller for a mini bagel, or larger for a deli-sized bagel)

3. Gently roll the dough balls on the floured surface of the silpat until they're smooth. Flatten each ball ito a disk, about 4 inches by 1 1/2 inches thick.

4. Verygently, with floured hands, poke a hole into the center of the dough an work it until the hole is about 1/2 inch in diameter. Repeat with all the dough. Let the bagels rise for 30 minutes.

5. Heat a pan full of water, at least 3 inches deep to boiling. Drop no more than 3 bagels in at a time (they swell as they cook)!

6. Simmer for 3 minutes, gently turn over and simmer for another 4 minutes.

7. Place back on parchment paper. When the tray is full, place in the oven and bake for 10 minutes.

Remove from oven and brush all over with egg white mixture.

Return to oven and bake for 20-30 minutes more, or until deep golden brown. Let cool completely before slicing.


09 October 2007

What HAVE I been up to??? Pretzels!


Suprepretzels Clone
Many thanks to Sande Guetthoff for asking me to develop this recipe for her. This makes individual sized soft pretzels that taste remarkably (scarily!) close to the real thing. They freeze beautifully and reheat well. For a treat, try the Bavarian Pretzel Sandwich Rolls Variation.

I'm including photos of each step to try and make it easier to visualize. Follow the directions carefully and you'll have real soft pretzels in no time!


2 Tbsp active dry yeast
4 c cold water
6 c Better Batter Gluten Free Flour
1/2 c light corn syrup or agave nectar
1/4 c butter, margerine, or butter-flavoured shortening
2 tsp salt

Flour, for rolling

Beaten egg whites (about 3)

10 c hot water
2/3 c baking soda
coarse pretzel salt, if desired.

Line three or four baking sheets with parchment paper.


wet batter1. Put the yeast in the warm water and let sit for five minutes. Add 4 cups of the flour, corn syrup or agave, butter/margerine/shortening, and salt to the yeast mixture and beat well, on high speed, for three minutes. The mixture should resemble very, very sticky cookie dough (or even a bit wetter).

2. Put a cup of flour thickly over a silpat or plastic wrap and place the dough mixture on this. Sprinkle with another cup of the flour. Now very carefully incorporate the flour (knead it by folding the batter in half, patting it out, and folding gently again) until all the flour is absorbed. This should feel like sticky play-doh.

dough balls3. Separate the dough into balls slightly larger than baseballs but slightly smaller than tennis balls.

The outside of the ball will get slightly dry to the touch, but the inside will be really tacky and sticky (click pic for a closer look).


4. Very, very lightly flour your rolling surface. Taking one ball at a time, with floured hands, roll the ball between your hands until it is about four inches long. Lay onto the rolling surface.
rolling pretzels
Roll the dough very gently until it is about 9 inches long. At this point, it will be really delicate. Begin to VERY gently pinch the width of the dough to make it longer, and alternate this with patting the dough gently down to make it flatter. Keep doing this until the dough is about 14 inches long.

raw pretzels5. Take the rope and quickly form it, on the parchment sheets, into a pretzel shape. Brush a little egg white or water under the surface of each 'foot' and onto the base of the pretzel to adhere the 'arms' to the 'body'.

Let rise for 30-45 minutes.


caustic bath6. Prepare the soda bath: Mix the 10 cups of water with the baking soda and (10 minutes before you're ready to dip the pretzels) heat to a boil. This will be cloudy in appearance. This should be ready just as the pretzels are done rising.


frothy bath7. VERY CAREFULLY, using as wide a spatula as you can (use two-- one to life and one to slide under and support!) lift the pretzel from the parchment paper into the boiling soda bath. This will boil up into froth, so it's really important not to do more than two pretzels at a time at most! Cover with a lid and time for 1 minute.

This solution will get stronger smelling with each pretzel and may even turn a weird bright golden yellow as the batches progress. That's okay!!

8. VERY carefully remove the pretzel(s) from the water and place back on the parchment paper. Continue to do this with the rest of the pretzels.

Meanwhile heat the oven to 350 degrees.

9. Brush beaten egg white over the pretzels and bake for about 15 minutes, or until deep golden brown. If you are going to eat them hot, sprinkle the salt on before baking. If you are going to freeze them, wait until you are ready to heat them to put the salt on.


Vegetarian Stroganoff


Vegetarian Stroganoff
This meal has all the great taste of beef stroganoff, but Utilizes my favorite lentil "meat" instead of ground beef. Feel free to use fat-free yogurt instead of sour cream, if you're watching your waistline.

8 oz lentils, soaked overnight in 6 cups of water, then drained.
1 cup-2 c water
1 tsp garlic powder or one clove garlic
1 tsp salt
oil, about a cup.

1 onion, finely diced

8 oz mushrooms, finely sliced

1 16oz carton sour cream

2 Tbsp Better Batter Gluten Free Flour

1/8 tsp pepper

salt to taste

1 recipe Pasta, prepared as noodles or store bought gf noodles (we like glutano tagliatelli)

Grind the lentils and seasonings in a blender using just enough water to keep the machine from burning up. The mixture should be thick, like cold cream or pudding.

Heat the oil in a heavy pot. Add the ground lentil paste and fry, stirring constantly. There should form a skin on the bottom of the pan, scrape this (this is the part of the mixture that will come to resemble ground beef). Keep frying and scraping (you can leave the mixture for several minutes to allow a crust to build up) until the mixture begins to look 'dry' and resembles cooked ground beef -- remember that this will firm up even a bit more as it cools, so leave it just slightly moist.
This took me 30 minutes on high heat.

Meanwhile, boil pasta water.

Cook the pasta.

At the last minute, stir the sour cream, salt, and pepper into the stroganoff. Put on top of pasta and serve.

Finally! The pierogies

No, I haven't left you. Yes I'm very busy.

LOL!

To make these, you'll need to start by making a base for stuffed pastas. This is really very easy:

Base For Stuffed Pastas

This is a great pasta recipe, especially for making homemade ravioli, pierogis, or kreplach. This can be rolled by hand or through a machine, and is very adaptable. Make sure to follow the instructions exactly as written.

4 cups Better Batter All Purpose Flour

1 generous tsp salt

2 large eggs

2 tbsp butter or shortening

2-3 c warm water

Put flour, salt, eggs, and butter or shortening in the bowl of a food processor. Put the lid on and turn the machine to 'on.' Pour just enough water through the feeder spout, in a constant thin stream, until the dough begins to resemble a very thick paste and sticks to the side of the machine. Take out of machine and let sit about 20 minutes. (Alternately: put all ingredients into the bowl of a kitchenaid mixer and mix on medium speed for about 1 minute. Add the water, slowly in a thin stream until the pastelike texture is achieved, then beat for a minute or two more. Let sit)

Proceed with stuffed pasta directions.


Potato And Cheddar Pierogies

Pierogis are stuffed pasta - reminiscient of ravioli, but filled with potato, cabbage, or meat. Originally of slovak and Polish origin, these delicious dumplings are a major part of central Pennsylvanian cuisine. Traditionally, pierogi are boiled and then fried in melted butter. Sheer heaven. These taste like clones of the popular commercial variety available in supermarkets. This is work intensive, so make a lot and freeze them.

5 pounds potatoes

1 onion, finely minced

1 pound extra sharp cheddar cheese, shredded

1 recipe Base for stuffed Pastas

Flour, for rolling, as well as a 3 inch round cookie cutter

water or egg white

Optional: butter for frying

Peel potatoes and cube. Boil a pot full of water and cook potatoes until soft, about 20-30 minutes. Remove from heat, drain, and mash.

Stir the onion and cheese into the potato mixture and set aside to cool.

Split the pasta in half, and roll out one half at a time. Place the dough on a floured surface (I like to use a silpat) and sprinkle generously with flour. Roll out until the dough is 1/8-1/4 inch thick.

Gently fold the dough in half to mark the center crease and unfold.

Using the cookie cutter, lightly mark circles on half the dough (do not cut through the dough!

Working quickly coat the marked side of the dough with water or egg white and place a large teaspoon (up to a tablespoon) of potato/cheese filling in the center of each circle.

Fold the dough over and press lightly to seal around the pockets of filling.

Using the cookie cutter, cut out the circles of dough. Gather and reroll the scraps, continuing to mark and fill the dough as instructed. Set aside to dry while you make the second half of the pasta.

Boil fresh water for the pasta (about a gallon for each two dozen).

Put the pierogis in the water and cook until they float, about 30 seconds.

Either serve, or fry in melted butter until lightly browned, then serve.


Pumpkin Pierogies

These pierogies are a sophisticated, 'grown-up' take on traditional Polish comfort food. The mellow winter squash is counterbalanced by warm undertones from spices and given a surprisingly delicious kick with the addition of fresh sage. A perfect dish for autumn.

2 pounds potatoes

2 pounds pumpkin, butternut squash, or other winter squash

1 large carrots, minced

1 onion, minced

1 clove garlic, minced

1 tsp ground coriander

1/2 tsp ground allspice

1/4 tsp ground nutmeg

1/8 tsp ground cardamom

2 eggs

1 recipe Base for stuffed Pastas

Flour, for rolling, as well as a 3 inch round cookie cutter

water or egg white

Bbutter for frying

1 bunch fresh sage

Peel potatoes and squash and cube. Boil in just enough water to cover until soft, about 20-30 minutes. Remove from heat, drain, and mash.

Stir the carrots, onion, garlic, spices, and eggs and set aside to cool.

Split the pasta in half, and roll out one half at a time. Place the dough on a floured surface (I like to use a silpat) and sprinkle generously with flour. Roll out until the dough is 1/8-1/4 inch thick.

Gently fold the dough in half to mark the center crease and unfold.

Using the cookie cutter, lightly mark circles on half the dough (do not cut through the dough!

Working quickly coat the marked side of the dough with water or egg white and place a large teaspoon (up to a tablespoon) of filling in the center of each circle.

Fold the dough over and press lightly to seal around the pockets of filling.

Using the cookie cutter, cut out the circles of dough. Gather and reroll the scraps, continuing to mark and fill the dough as instructed. Set aside to dry while you make the second half of the pasta.

Boil fresh water for the pasta (about a gallon for each two dozen).

Put the pierogis in the water and cook until they float, about 30 seconds.

Slice the sage leaves into thin julienne slices and quickly fry in the butter. Add the pierogies, fry in melted butter until lightly browned, then serve.

20 September 2007

So tired...


I haven't been posting much lately.

It's because my schedule hasn't really permitted it. I remember a time when I could spend hours typing fanfiction and blog updates and not even blink. The past two weeks haven't been anything like that.

My apologies.

I've got tons of great recipes languishing in my camera's eye, waiting to be blogged about. But for now, I'm sitting tight and trying to hang on even tighter. My guess is that tomorrow I'll be able to navigate to a shoal on the rapids of paperwork long enough to actually post something.

Thanks for your patience!
naomi

07 September 2007

Burrichaladas (When Enchiladas and Burritos collide)

Pretty?

Maybe not.

Tasty?

ZOMG!

This recipe was super good, and relatively quick and easy to make (I always make extra beans to store for make-over meals like this)

Warm, homemade corn tortillas (use storebought if you don't want to make them) are topped with a really savoury bean and eggplant-meat filling (there's that pesky eggplant, again!), loads of cheese, and a nice GF enchilada sauce.

This is really a cheater meal for me... so I didn't bother making homemade enchilada sauce.

The Carnivore liked it...said it needed more cheese (and come to think of it- note to self- probably lettuce!) The boys scarfed it down.

Burrichaladas
1 can gf enchilada sauce or homemade

8 corn tortillas (we made them, using masa, water, and a hot griddle, but you can buy them)

1 pound colby-jack cheese

1/2 pound/4 c cooked, mashed beans (we used canary beans)
1/2 pound eggplant 'meat from the marinara recipe, mixed with a healthy few tbsp of Goya Adobo -- essentially salt, garlic powder, and dried oregano

optional: guac, sour cream, lettuce, tomatoes-chopped


Not in the mood for that?

I also made a fun raw loaded-nacho that was pretty good.


05 September 2007

Spaghetti Squash With "meaty' Marinara


Beautiful, isn't it?

I fell in love with the raw vegan way of preparing 'meat' out of nuts and eggplant, and began to experiment with cooked versions of the same thing.

I've made this meat sauce several times, with the same reviews -- it looks and tastes very, very, VERY close to the real deal. Which is a good thing if you've got a Carnivore in the family.

THe spaghetti quash on the other hand... well, that was at the request of my six year old, and the Carnivore wasn't too happy with that.

Tonight I altered my usual 'meat' sauce, by using almonds instead of walnuts, and adding two green peppers to the food processor. It was a more subtle sauce -- less meat, more marinara -- and it was soooo good.

We served this with imported, grated Parmeseano-Reggiano, but shaky cheese or a nice vegan nurtitional yeast/almond cheeze will do nicely.


Meaty Marinara
1 pound eggplant
about 2 c walnuts or almonds
2 green peppers (optional)
2 tbsp gf soy sauce (I hear that all soy sauces made by the traditional method are actually GF, but if you're nervous, stick with a safe one)

Chop all of these on the pulse section of your food processor, or grate/chop finely. Stir into a nice organic marinara sauce (we bought one...Ragu Organic).

Serve on top of cooked spaghetti or spaghetti sauce.


04 September 2007

Naomi's Take on Taku: Peruvian Comfort Food Reconstructed


New Englanders have hash, The English have Bubble and Squeak. Peruvians... well, Peruvians take comfort food to a whole nother level. Taku Taku, which is a sort of leftovers-done-over was originally a Creolle food (read:slave) but it's been adopted by the richest, smarmiest restaurants in the United States (granted, they serve it with foi gras or some other ridiculous accompaniment).

Essentially taku taku in its original glory, is mashed beans and rice, seasoned with all kinds of oniony/saffrony goodness, fried until it has a crisp crust, and topped with a fried egg and plantains. If you're into over easy or 'up' eggs, it's a textural mouth-orgy waiting to happen.

I happen to think that the original presentation of taku taku is ugly as sin, and the preparation is ridiculously long and exhausting; so I took it upon myself to reconstruct the recipe for a friendlier, more attractive approach.

For those of you familiar with Puerto Rican Quisine, this has a similar feel and taste to Mofongo (but without the intense garlic overkill). Which means that it's notoriously heavy and filling.

A few notes on AUTHENTICITY:
CANARY beans are an absolute must for this recipe, at least if you want to be authentic. I dunno, after cooking, it seemed like they were terribly close to Great Northern Beans or even Limas; but I don't want to offend any purists more than I already am, so... use Canary Beans. :)

Naturally I didn't use the authentic pork fat and bits because a) pork is nasty and b) this IS a vegetarian blog. You can find plenty of real, pork-happy taku taku recipes on the net, if you want. Knock yourself out.

Aji Amarillo (which, to the best of my knowledge is a peruvian yellow pepper sauce) is hard to obtain here, so we used a regular yellow pepper, sauted and pureed, instead.

Here's my recipe, in any case:

Taku Taku Reconstructed
1 pound canary beans, soaked overnight and cooked till soft.
3 c cooked rice

4 tbsp olive oil
1 very large onion, minced into very fince fragments (we used a food processor)
3 cloves garlic minced
salt
pepper
1/2 tsp oregano
1 tsp American saffron (annato)

1 yellow pepper, sauteed in olive oil till very soft and pureed in a blender till smooth
more olive oil


very ripe, sliced Plantains
eggs

Heat the oven to 375 degrees. Prepare four oven safe soup bowls or casseroles on a cookie sheet.

In a small saucepan saute the minced onion and garlic in the olive oil, and add the annato, oregano, salt and pepper to taste, until soft. Remove half of the mixture and set aside.

Add the yellow pepper puree to the mixture that remains in the pan, along with enough olive oil to coat the bottom. Turn up the heat to medium high.

In the food processor, or by hand, mash the beans until they're a chunky paste. add to the mixture in the pan and stir for several minutes, until the paste begins to thicken. Add the rice, and stir some more. When the mixture looks like it's starting to brown/stick to the bottom of the pan, carefully spoon the mixture into the bowls and set them in the oven. Bake for at least 30 minutes, or until a golden crust forms. (this took me 45 minutes).

Meanwhile, fry plantains in butter or oil until caremelized.
About 3-5 minutes before taku is done, fry your eggs.

Slip the taku taku onto a plate, cover with an egg and some of the reserved onion sauce. Add plantains to the dish, and serve.

01 September 2007

Vegetarian Not-Quite Gumbo

So we had an abundance of squash. An abundance of tomatoes. And a friggin motherload of okra. Didn't really know what to do with it, so I created a recipe that is a melange of influences, from Puerto Rican rice and beans and Louisiana Gumbo.

We're not really doing fish anymore... price and mercury levels not really permitting... so I used dulse flakes to give the not-quite gumbo a sea taste without the sea-meat.

Pinto beans provided protein and body.

We used a large no-idea-what-it-is squash, which looked rather like a pumpkin. Feel free to sub in any firm fleshed winter squash you choose.

Everyone liked this dish, and it was even better the next day.


Not-Quite Gumbo
1 pound of pinto beans, cooked in water

1/2 c olive oil
1/2 c Better Batter Gluten Free flour, or really good cup-for-cup substitute
2 c diced onion
2 c diced green peppers
1 c diced celery
3 cloves minced garlic
4-6 cups chopped tomatoes
4 quarts vegetable stock or water
1 tbsp dulse flakes
1/8 tsp dried oregano
1/8 tsp thyme
1/8 tsp black pepper
1/8 tsp cayenne
1/8 tsp celery salt
1 tsp paprika
1/4 tsp basil

1 large winter squash, cut into 1/2 inch cubes
1 pound okra, with the stems cut off


1 large pan warm cooked rice.

Keep pinto beans aside.

Saute the olive oil and flour, until the flour thickens. Add the onion, green peppers, celery, and garlic and saute until soft, about 5 minutes. Add the tomatoes, water, and seasonings and saute for another 5 minutes. Add the winter squash, okra, and beans, and simmer over low heat for about 30 minutes. Or until okra is tender and squash is beginning to soften.

Serve over rice.

Vegetarian Dirty Rice

Vegetarian Dirty Rice

Dirty Rice was one of my favourite things to order at the Bojangles Restaurant growing up. Eggplant and sunflower seeds replace chicken livers for a seamless trasition to vegetarian. This is a great meal, especially if enhanced with some GF chile beans.

1/2 cup oil

1/4 cus Better Batter Gluten Free Flo, or a really good cup-for-cup gf flourur

1 cup minced onions

1 pound eggplant AND 1/2 pound hulled sunflower seeds, chopped into a very slightly chunky paste (use a food processor)

1/3 c celery, minced

1/2 c finely minced parsley

1/2 cup diced green pepper

1 clove garlic, minced or crushed

2 tsp salt

1 tsp pepper

1/8 tsp cayenne pepper

4 1/2 c vegetable stock

2 c long grained rice

Cook the rice in the stock.

IN a large pot, heat the oil and simmer the flour in it till the flour thickens. Add the onions and saute for several minutes. Add the eggplant pate and saute for several minutes. Add the celery, parsley, and garlic and saute for a minute or two, then add the salt, pepper, and cayenne and cook for another 3 minutes. Mix the cooked eggplant mixture into the cooked rice. Put in a 350 degree oven and allow flavours to meld for 20 minutes, then serve warm.

Optional, add 2 cans of GF chile beans for a full meal.

Watermelon Sorbet And Chocolate Mint Ice Cream


The weather's finally starting to fluctuate between cool and abysmally hot, which means at any given point in time I've got hot tea brewing and ice cream churning at the same time. Not a bad thing, mind you, but slightly schizo, if you ask me. I made these two delicous cold treats on the same day, and we ate ourselves into an ice-cream headache. Totally worth it. I don't have pics for the chocolate mint ice cream (it was scarfed too quickly). Sorry!
By now you should realize how ridiculously easy it is to make ice cream, if you have one of the new, handy-dandy ice cream makers that don't need salt and ice.


Watermelon Sorbet
1 large seedless watermelon
3/4 c agave nectar or, if you must, sugar

Blend watermelon and agave in blender till smooth. Freeze according to directions (about 25 minutes). Put in a separate bowl and let 'cure' in the freezer for another 2-3 hours, if desired.


Chocolate Mint Ice Cream
2 c coconut milk
1 c nutmilk
3/4 c agave nectar
1/4 c raw cacao (or 1/4 c chocolate chips)
several sprigs fresh mint (I like chocolate mint for this, but peppermint is dandy) or a few drops mint extract.

Blend all ingredients in your blender. Freeze in your ice cream freezer. Let cure for several hours in the freezer and top with magic shell, LOL.

28 August 2007

So I had a Day Off Today

So today was my day off.

HAHAHAHHHAHHHA


Sorry, had to get that out of my system. People who are stupid enough to own businesses don't get days off in the middle of the week. Silly me.

I looked at locations from which to launch a smallish factory. Found one, for a lovely price. Needs a bit of work, but what doesn't?

Also heard from several distributors and a university who are going to carry my product.

(Dear me mother, I've officially gone into Trade! What would Fitzwilliam think of me????)

Which of course means I'm going to rule the world.

You may not know this, but secret messages (written backward in latin, no less) are encoded my blog. World taking-type messages. I'd tell you, but then they wouldn't be a secret.

Okay... I'll tell you one: It says.... never mind.

So where was I? Oh yes, I worked 10 hours. And not 10 hours-but-I'm-secretly-surfing-the-net-and-chatting kind of hours either.

Good thing it was my day off.

Oh and had a huge order come in right as I was finishing and starting to make dinner.

Which means several more hours of work in addition to the ones I already had planned for tomorrow.

I've had a few weeks of this, btw.


So now you know where I've been and why there's been no updates.

Anyone want to buy a small manufacturing firm for several million dollars?

14 August 2007

Fun with Raw Foods: Berry Sorbet and Lime Daquari Sherbert


Have I mentioned lately how hot it is?? So hot. Soooo hot. Too hot to do anything hot. Well, to do anything but make lots and lots of frozen goodies. I've come up with two more icy treats to tempt your tastebuds... Berry Sorbet and Daquari Ice Lime Sherbet. Take a moment, wipe your mouth, and print out these recipes to try:


Mixed Berry Sorbet
2 quarts assorted mixed berries
3/4 c agave OR 1 Tbsp Stevia w/Inulin
Water

Blend Berries and Agave or stevia. Add enough water to make 1 1/2 quarts.

Pour into Ice Cream Maker and Freeze.


Daquari Ice Lime Sherbet
Zest of two limes
1 cup agave nectar
2/3 c freshly squeezed lime juice
1 1/2 c water
1c fresh nutmilk
3 Tbsp Rum OR 1 tsp rum extract

Blend all ingredients together and freeze in Ice cream maker.

07 August 2007

Pizza Night at the Poes


We have a semi-regular pizza night (semi, because in the summer it's usually too danged hot to cook), where I set out all kinds of colourful veggies and toppings and just let the kids go wild building the pizza of their dreams. Usually I have to yell at them to stop hogging up all the toppings, because they like to pile theirs somewhere in the 2-3 inch category, leaving cheese for the rest of us. Fortunately for me, mozzarella still does okay for me. Unfortunately for them... I want my stinkin' toppings!

Something I like to do, to make things easier, is to make pizza crusts in individual sizes and freeze them in a stack. Then I can just thaw out what I want, build my pizza, and pop it into the oven. If I'm feeling really rushed, I'll pull out a pre-built pizza and cook it from frozen. My recipes for pizza crust (BOTH normal GF pizza crusts and Better Batter Flour Pizza Crusts) and full techniques and instructions for making pizza and crusts ahead, with every variation you can think of is on my regular GF, sadly neglected, blog.

This particular night, I was also experiementing with RAW food, and I tried a dehydrated pizza recipe from one of my favorite raw foods cookbooks, the Rainbow Green Live-Food Cuisine Book.

Okay, Let me just say... this was possibly the worst pizza I've had in my life. Bad enough not to give you the recipe... The toppings were pretty good (I picked them off and ate them), but the crust was like a huge, thick slab of pesto-flavoured nut-butter. It was rough, I tell you. ROugh Rough. Make-something-else-to-eat rough.

Fortunately, I'd grabbed a bunch of toppings from my sons (eggplant, onion, green pepper, tomato, chantarelle mushrooms, shaved brazil nuts, black olives, basil) and was able to peg together a Pizza Salad.

Pizza salad is essentially all those ingredients in a nice italian vinagarette, especially heavy on the fresh oregano. Even better after it's marinated for several hours. I ate this for two days.

As for the rest of the family, they had a really great time chowing down on real, cooked, hot pizza.

If you're inclined to make pizza, feel free to follow my basic directions on my blog.

Add whatever toppings you desire, and it's pizza heaven! The pictured pizza below had artichoke hearts, fresh bufaletta mozzarella, black olives, green peppers, chantarelle mushrooms, thinly sliced fresh heirloom tomatoes, and minced onions-n-garlic, oregano, and basil. Like Pizza Hut, only scads better for you!