28 July 2007

Big Mouth Veggie Burgers

Okay, so I'm really, reaaallly excited about this one for so many reasons.

For one: I've found a way to hide eggplant and zucchinis (which are cloning themselves in my backyard, and apparently are the same thing in my CSA farm, which means there's entirely too much to go around. *le sigh* It's kale month all over again...).

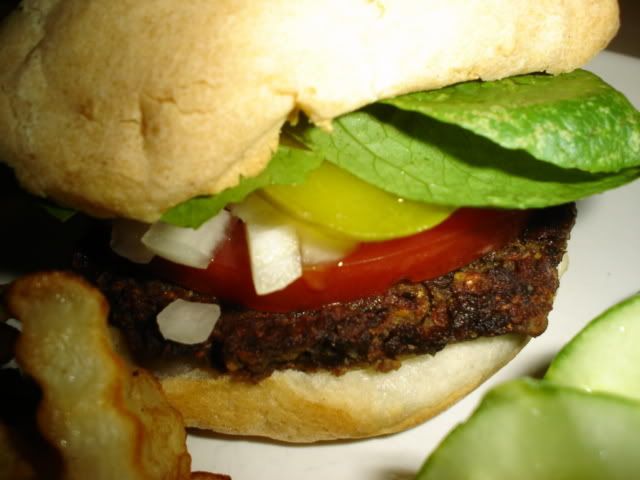
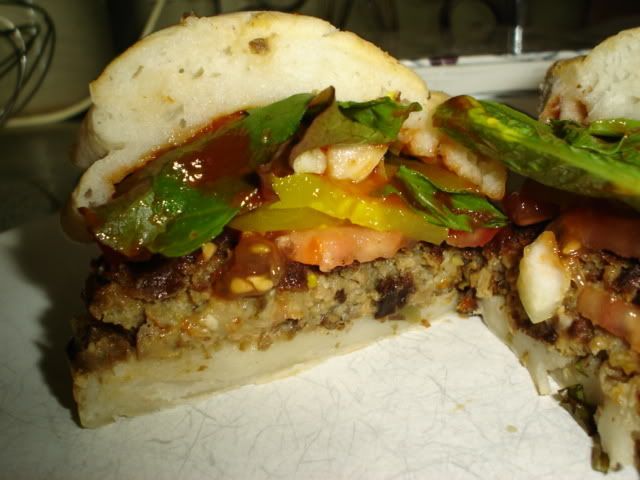
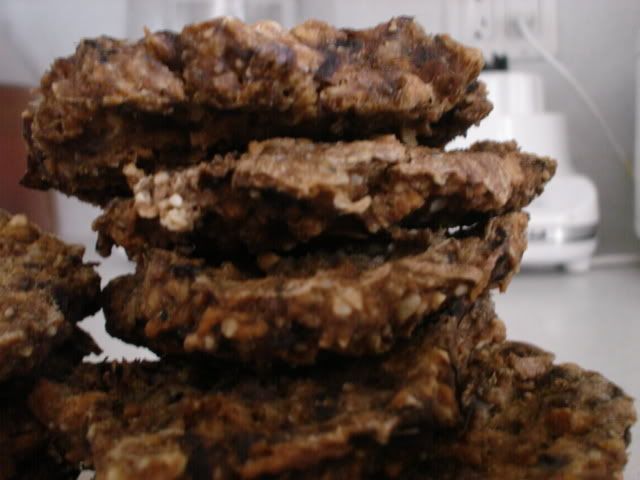
For another: This thing tastes pretty darn close to real, and it looks pretty darn close to real, and... The Carnivore liked it. 'Nough said.


I picked up a lot of tips and tricks from my raw-foody friends and decided to use them in the making of these burgers. The whole dehydrating thing solves a lot of the problems we Martha-Stewarts tend to have with homemade veggie burgers-- you know, too wet, too crumbly, won't stay together, gets soggy... whatever.

If you wanted to make the burger vegan, you could easily sub in flax-egg for the eggs. And, I suppose you could make this raw by simply dehydrating the things for an extra couple of hours.

Also, feel free to sub in soaked, chopped walnuts for the soy protein. (we're using up what we've got left before dropping soy)

As for me and mine, we chose to go all the way and ate these, cooked, on nice fluffy fresh GF white hamburger buns with lots of crinkle fries and some cucumbers.

One note -- the last minute frying/sauteeing in oil of these is really really key to making the mouth feel of a real burger. If you're not against cooking, please try this! Recipe instructions below:
Big Mouth Veggie Burgers

5 cups eggplant, with skins, cubed
1 large zuchinni, cubed
1 onion, minced
3 cloves garlic
1 healthy tsp black pepper
1tsp DRIED oregano
3 eggs
1/2 cup (generous) Worcestershire sauce
1 1/2 cups almond-Parmesan mixture (from my other recipe)
1 cup Better Batter Gluten Free Flour (or really good GF flour with xanthan gum in it)
2 cups tvp, reconstituted with hot water


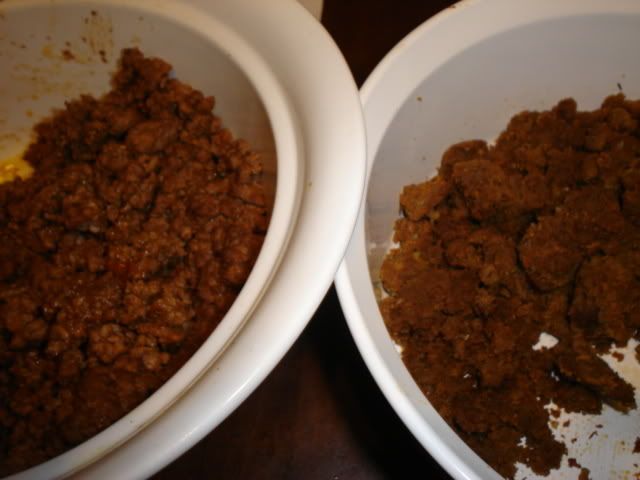
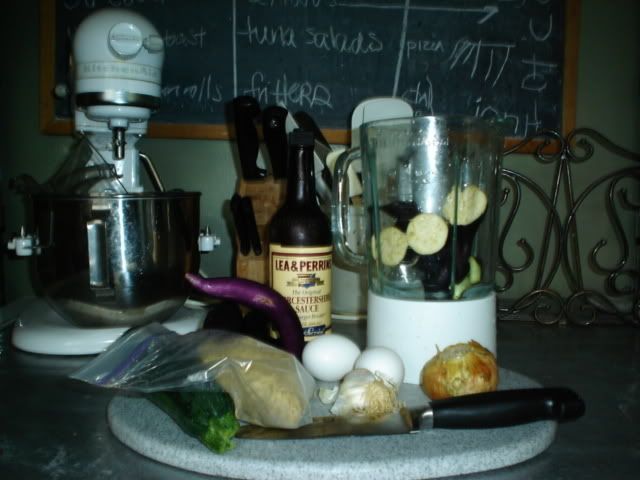
1. IN blender, grind 3 cups of the eggplant, the zuchinni, the onion, garlic, black pepepr, oregano, and Worcestershire sauce, until smooth.

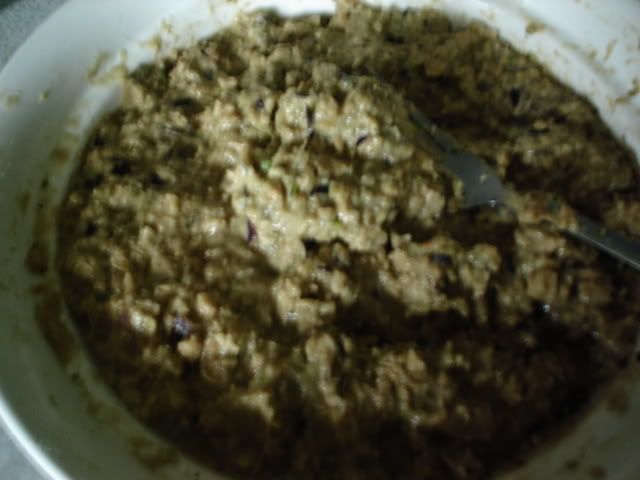
2. Add the rest of the eggplant and blend until chunks the size of peas remain.


3. Add the almond parmesean mixture, flour, and tvp. Let sit for 10-30 minutes.


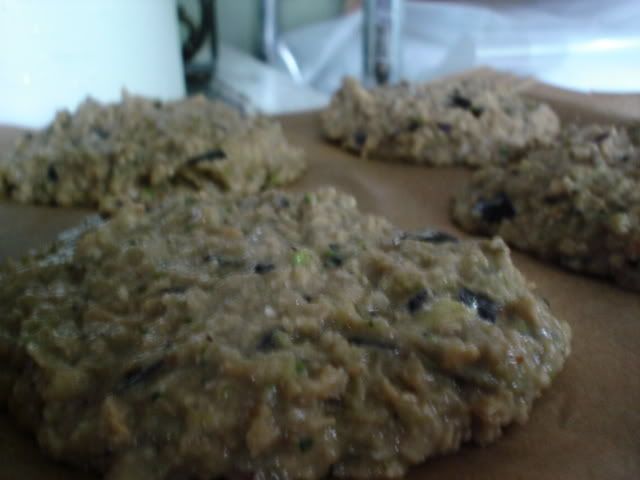
4. Line several baking sheets with parchment paper. Using a spoon and your hands, form the mush into burgers on the paper (this will be soupy, like soupy oatmeal).


5. Dehydrate in the oven at 110 degrees for 6-8 hours, flipping after three hours (carefully!) to ensure both sides get done.

6. Fry in oil right before serving (we like coconut oil!). Assemble burgers and eat.


Delish.


How to Do Really Good Fried Rice

Fried Rice is pretty straightforward-- take leftover rice, fry it with other leftover tidbits, and serve.

But there's a difference between fried rice you'd serve along side of a dish and fried rice you'd serve AS a dish.

This is one thing I've got down to a science. Even the Carnivore actually REQUESTS this as a main meal.

There are a few secrets to really good fried rice, and being the generous gal I am, I'll share them with you.

First, make sure you sprout your rice. This will, of course, make the rice stickier when you fry it...but it will also stick to your ribs and satisfy you. To sprout rice, just soak it in water for at least 24 hours (this is only going to work if you use a fresh, nice brown rice, not that white stuff).

Second: Make sure your rice is really stale. It helps to keep it in the fridge, uncovered, for a day or so.

Third: Essential... sesame oil (abou t1/4 tsp in your cooking oil), ginger (not powder), garlic, soy sauce/tamari (gluten free, of course!).

Fourth: Not essential, but great...1/4 tsp of saffron or american saffron added to the cooking oil.

Fifth: If you're going to add eggs, make them separately, in OIL (NOT butter)

Sixth: Peas and Carrots. Dunno why, but peas and carrots make the best fried rice. Oh...add a really finely diced onion.


Here's the basic ratios:

2 quarts stale brown rice
1/2 c coconut oil (or other oil)
1/4 tsp sesame oil
1/4 tsp saffron (yellow colour)
1/2 tsp ginger paste or grated
2 cloves garlic, crushed
pinch salt
1 onion, minced
2-3 c mixed frozen peas and carrots
2-3 eggs, scrambled separately

sesame seeds for topping.


Fry everything and mix together. YURM

Because it's hot... Bananas Foster Ice Cream

Yeah, so that's a really zoom up of the picture. But Good Golly Miss Molly, do you see how luscious that ice cream is? And it's dairy free. I have to crow a bit because the Carnivore took a single bite and exclaimed (exclaimed, mind you!!!) "That's good!"

High praise, indeed, from the man who might possibly say "That's decent" for something utterly divine. If the Carnivore calls it good, it's really good. Company good. Forget-company-and-shag-your-wife good.

Anyway, I think you'll like this one: it's easy, quick, and as I said before, DAIRY FREE!!!! (Having such a happy summer, I am). That 50.00 ice-cream maker was soooo worth it.

Bananas Foster Ice Cream
1 Cup Nut Milk (feel free to use rice milk)
2 Cups Coconut Milk, full fat
3/4 cup agave nectar
2 tsp vanilla
3 large bananas
1 tsp cinnamon
1/4 c golden rum

In your blender, mix the milks, agave nectar, and vanilla. Freeze according to your manufacturer's instructions (mine takes 30 minutes), or pour into a bowl and freeze, beating every 15 minutes for three or so hours.

Clean your blender.

Place two bananas and the cinnamon and rum in the blender and blend til smooth.

Cut up the remaining banana into small dice and mix into the smooth sauce.

Remove the ice cream from the mixer and fold the banana sauce into the soft ice cream. Place in the freezer (top with an airtight seal or plastic wrap) and freeze til firm.


27 July 2007

Homemade Magic Shell

See the incredibly guilty looking dessert on the left? That's health food, ladies and gents! I kid you not.

When I was growing up I was literally addicted to Magic Shell Topping. You remember Magic Shell, right? It was a really sweet, watery chocolate syrup that miraculously hardened on ice cream to produce a coating that was strangely reminiscent of Klondike Bars.

The taste was weird... kind of like really bad Easter candy. And that's what made it so good.

As a kid I remember sneaking into the kitchen to add extra Magic Shell to my ice cream. This degenerated into pouring Magic Shell into a spoon and freezing the spoon. Things only continued to spiral downhill from there. Somewhere along the journey, I found myself drinking the stuff from the bottle, warm... I told you I was addicted.

Anyway, since going healthy, I've religiously avoided the stuff. Avoided and missed it terribly.

Tonight the craving got too bad, so I decided to make some for my family. How hard could it be, I mused...

Magic Shell's main ingredient seems to be oil -- all kinds of scary, hydrogentated oil. Scary, hydrogenated COCONUT oil.... I wondered if I could use coconut oil (the real, unrefined, beautiful kind that I could literally eat plain) and real chocolate and achieve the same results.

Obviously you can guess from my pics that................I DID IT!!!!!!!!!!!! And the best part? It's good for you. Coconut oil is a great thing to take for metabolism and general health, and darker chocolates are also supposed to be good for you... so I can rationalize this one into eternity.

The weirdest part? It tastes 'right'... guess that taste was the coconut oil all along. For those of you who are wondering, 'right' is weird at room temperature, and divine frozen.

This shell goes only satiny smooth and very thin, and freezes to a perfect shell-like finish.

Now, if only someone would stop me from drinking it from the canning jar (old habits die hard, I suppose).

Homemade Magic Shell Topping

1 cup coconut oil

about 1-2 cups semi-sweet, bittersweet, or dark chocolate chips or chunks


1. Melt the coconut oil over very low heat in a small saucepan.

2. A little at a time, whisk in the chocolate chips, until the mixture resembles very thin, chocolate syrup (those of you who've had Magic Shell know exactly what this looks like). We needed about 1 1/2 cups.


That's it! This stuff stores at room temperature. IN a cold room, make sure to heat over very low heat on the stove.

Oven Baked Chiles Rellenos

Of course pepper season is upon us, and I was really excited (and in the mood for) some serious mexicano fixin's. Chiles Rellenos is something I always order when out.... and usually find disappointing. Most of the time I get a slimy, soggy, greasy sodden mass of cheese and egg on a mush-thats-supposed-to-be-peppers.

There are exceptions. One night, coming home on a winding, mountain back road from a celiac support group that was several hours from my house, I stumbled on a little diner. I walked in, expecting to order my traditional "salad, no croutons PLEASE with a side of fries, but only if they've been in a dedicated fryer and by the way can I see the seasoning on them?" and found instead Rellenos Nirvana. I highlight the words because the food was that good.

Turns out this hole in the wall is the property of a native Mexicana and OH MY GOSH could that woman cook. Real mexican food (and gluten free???) in Pennsylvania? There is a God.

I'd try to describe the dish, but really I was in a haze of food ecstasy and only remember flashes of brilliance -- it is those flashes that I tried to recreate here.

Anywhoodles, what you need to know is that this meal was so delicious and easy that it deserves a special place in my recipe collection. Slightly softened Poblano chiles highlight fresh bean puree, seasoned with fresh herbs. Coriander provides a hidden, special flavour accent. A light batter poured on top of the chiles and baked helps lighten the dish, somewhat, before cheese and sour cream weigh it down.(Hey, they help take the heat...and the migraine...was totally worth it).

For a special flavour, try using a good Gouda cheese (like Vincent). The nutty flavour brings out the taste of the batter.

One note about chiles: Poblano, the most commonly used chiles for Rellenos
vary widely from pepper to pepper in heat. For this reason, I don't reccomend adding additional cayenne or other spicy seasonings to the dish. If you find the dish too milk for your taste, load on some hot sauce and go to town!

Feel free to use dried herbs, but remember to reduce the amount by at LEAST half.

Here's the Recipe:

Chiles Rellenos

4 Poblano Peppers (use large chiles), green peppers will do, but won't be as good
2 tbsp coconut oil
cumin

2 1/2 cups cooked or canned abichuelas rosadas (pink kidney beans)-- feel free to use any bean
Several teaspoons fresh cilantro
1 teaspoon fresh coriander ( you can use 1/4 tsp dried)
several teaspoons fresh oregano
several teaspoons fresh parsley
1 teaspoon salt ( we use sea salt)

3 eggs
3 tbsp Better Batter Gluten Free Flour

4 ounces Gouda Cheese, or feel free to use any mild, white cheese
1/2 cup sour cream
salsa

Preheat oven to 400 degrees.

1. Heat the coconut oil in a heavy saucepan. Cut the peppers in half and seed and de-vein them. Fry the peppers in the oil ONLY until the peppers blister. Sprinkle with cumin, remove from heat, and place in a casserole dish.

2. In your blender mix the beans, herbs, and salt.

3. Spoon this mixture into the peppers, filling completely.

4. Mix together the egg and flour and pour over the peppers. This will be thick. Feel free to thin it with a bit of water to preference.

5. Place casserole in the oven and cook for 15-30 minutes, or until batter sets and peppers are softened to your preference (we like them still firm...al dente).

6. Remove from oven, top with cheese, sour cream, and salsa, and serve.


26 July 2007

Fun with Raw Foods: Nut Milk, Chocolate Chip Cookies, and Ice Cream!

I've been intrigued by the whole 'raw foods' thing for a few weeks now... perhaps in direct response to the joy of eating lots of char-grilled meat. Although I don't think eating a raw-food-lifestyle will ever be for me, there are a lot of really cool recipes out there.

We've been thinking of dropping dairy for some time, now, and reading about soy recently has scared me off of soy-milk, especially for my boys. I'd decided to start subbing in non-soy alternatives when I came across some great raw-food books that had tons of recipes for nut milks.

Of course that got me thinking (the recipes seemed pretty consistent and very flexible), so I decided to try my hand at it.

Nuts, of course, can be prohibitively expensive (especially the raw organic), so I decided to sub in an equal measure of sunflower seeds for half the nuts in my nut milk recipe. The results were fabulous! This is a milk I could happily drink every day, and at 2.50 a gallon, it's really affordable. I even made chai tea with it this morning, and lurved it.

I took the nutmilk and used it (with coconut milk) to make homemade strawberry ice cream. If I dare say so, it tastes VERY close to Breyer's 'natural' strawberry ice cream, and the best part was it only took twenty minutes from top to tail! (I lurve my new ice cream maker, which requires no rock salt or ice). When I priced it out, it was WAY cheaper than the premium, organic ice cream I'd been buying (about 1/3 of the price), and (even better) it was dairy free!

I still had a ton (well, two cups) of nut fiber paste left over from making the nutmilk, so I decided to try my hand at making raw cookies, and see if it was really true that they tasted like real cookies. Instead of reading a bunch of recipes from people who, possibly, couldn't remember what a real cookie tasted like, I decided to develop my own recipe.


According to the kiddos, the flavour is great. The texture is slightly different, which is to be expected (and we probably will continue to make toll house cookies forever), but this IS a fabulous way to use up that nut fiber.

I'm including the recipes below:

Frugal Homemade Nut Milk
1 cup raw, shelled sunflower seeds
1 cup raw nuts (I used brazil nuts)
1 gallon water
1/4 cup agave nectar
1 Tbsp vanilla extract
1/2 tsp sea salt (more or less to taste)

1. Soak the seeds and nuts in the water for 4-8 hours, or overnight.
2. Pour half of the water into a bowl, reserving it.
3. Place the remaining water and nuts into your blender, and blend on high speed for several minutes or until liquified.
4. Line a strainer with a very large nut bag (or, if you don't have one, a very large clean cloth napkin that doesn't have any kind of fabric scent or softener in it), and place over the reserved bowl of water then slowly pour the nutmilk slurry into the napkin. You may have to do this in batches. Squeeze the bag/napkin until all the liquid squeezes out. Reserve the nut fiber for recipes.
5. Season the milk with the agave nectar and vanilla, adding the salt a little at a time until the flavour you like is reached. Refrigerate up to a week. Shake well before using.


Dairy Free Strawberry Ice Cream
1 cup nutmilk
2 cups coconut milk (full fat version)
1/4 cup agave nectar
1 pint strawberries
1 tsp vanilla extract
pinch sea salt

Blend all of this together, then freeze in your ice cream maker, as per directions, or place into a large metal or glass bowl and freeze, whisking every fifteen minutes (you'll want to whisk it hard), for about 3 hours or until creamy and fozen. Transfer into a air-tight container and freeze til firm.

Raw Toll-House Cookies
2 cups nut fiber (from nutmilk)
1/2 cup nutmilk
1/2 cup agave nectar
1 tsp vanilla
1/4 tsp sea salt
1/2 c chocolate chips
1/2 c walnuts

Mix all ingredients until thoroughly combined. Shae dough into cookies and place on a dehydrator. Dehydrate at 110 degrees for 6-10 hours, or until 'cooked'. Store leftovers in the fridge.

Almond Crusted Zuchinni with Pasta and swiss chard


We're back from vacation, otherwise known as meat-paradise. The family came to visit, and they're on a diet which consists mostly of grilled meats and veggies, so we really indulged. It was a great vacation, but I have to admit, I think I've lost my taste for meat and potato type meals.

I was actually relieved to plan a low-meat week.

Zion, my newly six-year-old crumb-cruncher got, of course, first pick (everyone gets to eat EXACTLY what they want to eat for their birthday) of the menu. He chose:

Almond Crusted Zuchinni, using a trick I took from Seamaiden's Book of Yum

Salad
Spinach, sauteed with garlic and maple syrup (Sounds weird but it's FABULOUS. We subbed in swiss chard, because it was available)
Spaghetti with Red Sauce

Dessert: Berries with Chocolate-Amaretto Whipped cream

Surprisingly the zucchini coating, once fried, tasted exactly (to me) like fried chicken, which was unexpected, but not entirely unwelcome. I made sure not to overdo the zucchini, as I like a little more bite and a little less slime to my squash.

The swiss chard wilted into a lovely broth, made from the juices of the chard, some fresh garlic, and a judicious addition of maple syrup. The flavour was complex and satisfying, slightly salty, and altogether fabulous accompanying the meal.

The spaghetti (I chose to use Tinkyada) and sauce (Martin's store brand of organic marinara) was good, if typical, and was helped with a little sprinkling of the almond-yeast mixture, which tasted exactly like parmesean cheese (but was way cheaper than the parm I usually shill out for).

I'm posting the recipes below:


Almond Crusted Zucchini

Several Zucchini, cut into medallions (we used about a half a zucchini per person)
3 cups slivered almonds
1 tsp garlic powder
1/2 cup nutritional yeast
1 tsp sea salt
1 egg
olive oil and coconut oil

1. Beat the egg in a bowl. Set aside
2. In a blender, grind the almond slivers, salt, garlic powder, and nutritional yeast, until the mixture resembles parmesean cheese. Place in another bowl.
3. Heat equal measures of olive oil and coconut oil on medium high heat (about 300 degrees) in a very heavy saucepan.
4. Dip the zuchinni in the egg, then the almond crumbs pressing to make sure the coating adheres.
5. Fry in the oil, turning once, until each side is golden brown. MAKE SURE that your oil doesn't get too hot or you'll scorch your nuts!!
6. Transfer to a baking dish and cook at 350 degrees for about 30 minutes. Meanwhile cook your pasta, heat your sauce, and make the chard.


Maple-Garlic Swiss Chard
2 pounds swiss chard or spinach, cut into bite sized pieces
1/4 cup olive oil
2 small cloves fresh garlic
2 Tbsp maple syrup
sprinkle of sea salt

Heat the oil in a heavy saucepan, adding the chard and garlic. Cook for 7 to 8 minutes, or until the leaves begin to wilt. Add the salt and maple syrup and cook for a few more minutes. Serve immediately.


Mixed Red Berries with Chocolate-Amaretto Whipped Cream
2 pints raspberries
1 pint strawberries
1 cup whipping cream, chilled
1/4 cup semi-sweet chocolate
1 Tbsp amaretto liquor

1. IN a double boiler, melt the chocolate chips with the amaretto and 1/4 cup of the whipping cream. whisk well, and allow to come to room temperature.
2. Meanwhile, pour 3/4 cup of whipping cream into a mixing bowl and put in the freezer for 30 minutes, along with the beater(s)
3. Beat at high speed until soft peaks form.
4. Slice berries and place in a bowl. Top with the cream and serve immediately.

02 July 2007

Tacos Even a Carnivore will Eat


We've tried various veggie-taco-meats over the years. The best ones were made of wheat gluten, which is a complete no-no, now, in our family. The rest were so-so or so highly seasoned that we might as well have placed whole cloves of garlic in the shell and been done with it. This is particularly problematic, since tacos is a fan favorite with the Carnivore.

A few nights ago, I randomly observed that lentils, soaked and ground, cooked into something that looked and felt remarkably like hamburger, so I decided to experiment tonight and see if I couldn't really pass them off as hamburger in taco-meat form.

I took soaked lentils, ground them in the blender with taco seasoning and garlic powder (and some salt), then fried them in oil, stirring-stirring-stirring, until they formed into 'taco meat' -- this I seasoned with the normal amount of taco seasoning, and served it without saying a word.

The Carnivore's fist question: "Why does this meat look a little different than usual?" -- He likes very fine ground beef in his tacos, and I usually make bigger chunk-style. This was finely ground. "Because it's not meat," I answered.

Now, I expected rejection immediately, so I informed the Carnivore that he had a whole pan of meat waiting (I mean, this IS his favorite meal), in case he didn't like the 'meat' -- to which he replied that he'd already tried it, and it was fine.

The Carnivore then proceeded to eat the lentil-meat, as did the little sillies, and the ground beef was picked at.

SCORE!


Here's a pic of the ground beef next to the lentil-meat: Can you tell which one is which?


This tasted wonderful, not beany at all, and it was a cinch to make. I'll have to try this technique for other dishes. Here's the recipe:


LENTIL "GROUND BEEF"


8 oz lentils, soaked overnight in 6 cups of water, then drained.
1 cup-2 c water
1 tsp garlic powder or one clove garlic
1 tsp salt
(if using for taco meat) -- 1/2 c gf taco seasoning
oil, about a cup.

Grind the lentils and seasonings in a blender using just enough water to keep the machine from burning up. The mixture should be thick, like cold cream or pudding.

Heat the oil in a heavy pot. Add the ground lentil paste and fry, stirring constantly. There should form a skin on the bottom of the pan, scrape this (this is the part of the mixture that will come to resemble ground beef). Keep frying and scraping (you can leave the mixture for several minutes to allow a crust to build up) until the mixture begins to look 'dry' and resembles cooked ground beef -- remember that this will firm up even a bit more as it cools, so leave it just slightly moist.
This took me 30 minutes on high heat.

At this point you can use it for anything calling for pre-cooked ground beef. YUM